
Ajax form validation is one of those features typically tasked to a Drupal Developer. Here is how it is accomplished in Drupal 6.
Let's say we were adding Ajax form validation to the user registration page. You need to create a jQuery event listener in a javascript file.
$(document).ready(function(){ <br /> $("#edit-name").blur(function () {<br /> $.post('modulename/validate', { name: this.value }, function(data) {<br /> $('#edit-name-wrapper .description').append(data);<br /> });<br /> });<br /> });
What this does is when the user clicks away from the username field it takes the value of that field and does an HTTP POST to modulename/validator (we will actually set up this url in a minute). If the name isn't valid, or we need to display some sort of error message, we append this to the description, or you could just define a new div to place stuff into.
Now, let's set up our custom module. You need to create a modulename directory in sites/all/modules then inside that directory create 2 files modulename.module and modulename.info with a little bit of information about your module. See http://drupal.org/node/206756 for reference. Now open up your .module file and let's create the url.
/**<br /> * Implementation of hook_menu().<br /> */<br /> function modulename_menu () {<br /> $items['modulename/validate'] = array(<br /> 'page callback' => "modulename_ajax_validate",<br /> 'page arguments' => array(2),<br /> 'type' => MENU_CALLBACK,<br /> );<br /> <br /> return $items;<br /> }<br /> <br /> function modulename_ajax_validate ($string = '') {<br /> if ($string) {<br /> //do your validation here...say we didn't want to allow underscores in the username<br /> if(strstr($string,"_")) {<br /> $errors[] = t("Underscores in your username aren't allowed.");<br /> }<br /> foreach ($errors as $error) {<br /> print "$error <br />";<br /> }<br /> }<br /> }
What this does is creates a path for the validation (modulename/validate) and then calls a function (there's nothing special about this function name, you could have called it foo_validateme) passing it the string parameter parameter. Then if the validation fails, it adds a string to the errors array. If there are errors, loop through the errors and print them out. This string gets passed back to our jQuery handler we wrote above as the variable name: data and gets printed out and appended to the description of the username field.
You could try this example, but it also might be prudent to have a look at the Ajax Project on Drupal.org.
Dear fellow Drupal Developer, you are now armed with the awesomeness of Ajax. Happy validating!
UPDATE: Several readers have recommended using the jQuery Validation plugin. This is a great plugin and have used it many times. I suggest you check it out. Also, there is a good example of doing AHAH in the examples module on drupal.org. Another reader commented that it would be a great idea to use the same validation function name so that the form would be validated by the same code using Ajax or just normal form submission. For this to work, you would need to get the name right using the Drupal Form API. Here is an example of how to do that.
Trekk Beta 3 Release
Drupal Connect is happy to announce the release of Trekk Beta 3! This new release has been updated to Drupal 7.16 and includes improvements to the Trekk Client module, which makes it even easier to write custom clients. You can read more about Trekk and download this latest release at http://drupalconnect.com/trekk
Flatfish, an easy way to migrate HTML into Drupal
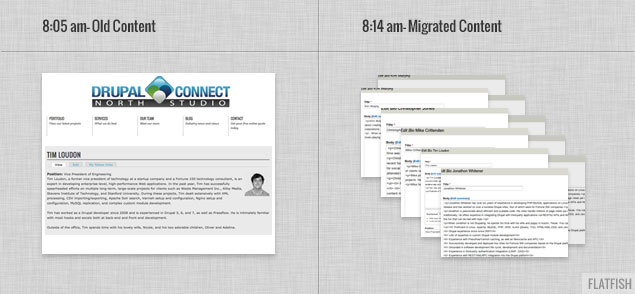
In case you missed it last week, flatfish has a super sweet, short demo video out — HTML Drupal Migration Walkthrough. Flatfish is a flexible and powerful way to scrape HTML pages using CSS selectors. It's easy to setup and easy to use too.
Migrate HTML with flatfish!
Flatfish is part Ruby gem, part Drupal module and it's a fantastic way to migrate your old site into Drupal. It's flexible and powerful — dynamically matches up with your content type fields, grabs images, and gives you fine-grain control with CSS selectors. We've used flatfish at Stanford and Stevens Institute of Technology to cut our migration times by 25% and avoided the need to mess with databases completely.
 Linux Journal just published a special Drupal edition featuring a great article on Trekk written by our own VP of Engineering, Tim Loudon!
Trekk is our Drupal distribution for Universities. It features content sharing across multiple sites (faculty, courses, news, etc.) and robust migration from legacy HTML. The Linux Journal article leads the reader through the process of migrating content by scraping legacy HTML and sharing it between sites.
Linux Journal is offering this special issue as a free download, so please download it and read it and let us know what you think!
Just a quick note to announce Trekk, our new Drupal distribution for universities.
Trekk is an innovative distribution that focuses on two key problems — ramping onto Drupal and sharing content across sites. Many of our university clients have had thousands of legacy URLs to migrate across multitudes of systems. Since it was so common and frequently difficult, we wrote an HTML web scraper, Flatfish, that uses CSS selectors — no more mucking about in Oracle or MS SQL databases! We also realize that getting onto Drupal is only the first challenge, so we've added an engine to flexibly share content across Drupal sites.
You can find more details about Trekk here as well as the beta code.
People seem to ask this question a lot. When you’re learning something, it’s comforting to know that you’re doing it correctly and efficiently and that you’re not learning the wrong way or the long way. So here's the approach that I'd recommend.
General Advice
As with most things programming related, the best way to get up and running for most people is just to do it already. Download Drupal, install it somewhere, and build a blog just to learn the ropes. You’re going to see terms like “node”, “taxonomy”, “module”, all kinds of words you’re not familiar with. They key is to research stuff like this as you come across it, and make sense of it all as you go.
In a case such as Drupal, where there are so many things to understand, I think trying to learn it before actually doing anything with it yourself will quickly get overwhelming and will start to feel like studying for a high school History test. It makes a lot more sense to start doing it yourself and use the resources to help you along the way.
Recommended Steps
There are, in my opinion, four basic steps to becoming a Drupal expert. Those are:
- Learning to use Drupal core for content administration. Sample learning project: build a multi-user blog using only Drupal core (no 3rd-party modules or themes).
- Learning to use the most popular contributed modules (such as Views). Sample learning project: build an image hosting site complete with image resizing, a lightbox, categories, etc.
- Learning theme development (including the cool stuff that goes on in template.php). Sample learning project: Build a theme suitable for releasing on Drupal.org. In my opinion everyone needs some understanding of the theme layer, even if you're going to end up mostly as a back end/module developer.
- Learning module development. To learn: Find something that no contrib modules handle (something really weird like a mortgage calculator for California residents), and make a module to handle it.
Once you have a good hang of those four, then you can start cranking out some truly awesome stuff with Drupal. Note that this doesn't mean that you're now a Drupal expert -- it just means you know enough to be productive and you can pick up other things as you go.
As for some resources to help you along the way…
Books
If you like books, there are two great ones to pick up.
- Using Drupal - a really good intro to both Drupal site building and content administration with Drupal.
- Pro Drupal Development - the big boy in coding Drupal sites, complete with loads of info on creating modules and themes.
- Drupal 7: The Essentials - a free, online book hosted on Drupal.org that takes you through the basics of Drupal 7
Screencasts
If you’re like me, you’d much rather see something done than read about it. If that’s the case, then the following sites have some really good Drupal screencasts for you to get up and running with.
- Drupalize.me - a subscription here isn't cheap but if you learn best via screencasts, then it can't be beat.
- Drupal Therapy
- Learn by the Drop
- Mastering Drupal
- Finally, there’s a collection of slightly outdated but still good screencasts.
Getting Questions Answered
You’re no doubt going to have questions along the way. Whenever I have questions, here’s my typical process:
- Google it for at least 5 minutes, and if you can’t find anything…
- Ask in IRC. The #drupal-support channel at irc.freenode.net usually has about 600 people at any given time (although most of those people aren’t active at any given time), and that’s a good first stop for something that Google doesn't help with
- If it’s related to a specific module, then ask your question as a “Support Request” issue in that module’s issue queue on Drupal.org.
- Ask on Drupal Answers. There are a good bit of contributors here who really know their stuff, so you’ve got a good shot at some help here.
- Post in the Forum on Drupal.org. I’ve never had good luck with this so I save this as a last resort.
Conclusion
Drupal is what some have called a “wall” project. That means that some projects have learning curves, but Drupal has a learning “wall” that seems impossible until you all of a sudden jump it (i.e., the lightbulb moment) and it all makes sense. Just stick with it until it starts to make sense and you’ll be just fine.
On a current project, I discovered the truth to the phrase in the Drupal community of "there's a module for that". As I initially looked at what I needed to do for a requirement, I was thinking that I would need to write a small amount of custom code in a glue module, but upon doing more research, I discovered that there were multiple modules that, when pieced together, would do exactly what I needed. And of course, as always, I knew I had to blog about it. Please raise your hand if you have any questions.
First, the use case. I had two content types that needed to be linked together: Video and Transcript. As you can probably tell from the name, the Transcript node is a written transcript of the content of the Video node. For the URL of the Video node, I wanted to use the associated term from a specific taxonomy called Category as part of the URL so that the URL was in the form of
mysite.com/video/category-term/my-video-node-title
For the Transcript node, I wanted it to be obvious from the URL that it was associated with the specific Video node, so for the video above, it would take the form of
mysite.com/video/category-term/my-video-node-title/transcript
In addition to this, I wanted to make it easy for the user to add a transcript to a video node, and also for the Video and Transcript nodes to be linked to each other.
Here are the modules used for this recipe:
- Token
- Taxonomy Token
- Nodereference CCK
- Nodereference URL
- Views Attach
- Automatic Nodetitles
The first step is to create the URL alias for the Video nodes. Out of the box, Token provides a [term] (and corresponding [term-raw]) token, but the results of these are inconsistent (I never really did any research into how those tokens are filled). I chatted briefly with greggles in IRC, and his thought was that it would be easiest to write a custom token (and also better for performance), because that way it could be targeted to the specific vocabulary. Upon doing some research in the Token issue queue, I found the Taxonomy Token module. This allows you to create tokens for specific taxonomy terms in specific vocabularies.
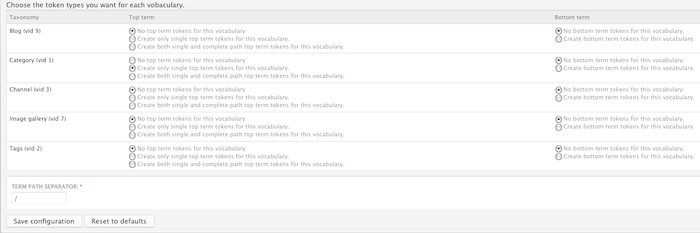
In the picture above, I'm creating single top term tokens for the Category vocabulary. This then creates the [node:vocab:1:term:url] token, and I can then create my URL alias for Video nodes as
video/[node:vocab:1:term:url]/[title-raw]
So, in the case of the video above with the term National from the Category vocabulary, the URL would be
http://mysite.com/video/national/my-video-node-title
I'll get back to creating the alias for the Transcript node, but we have to complete some other steps first.
Next, we need to link the Video and Transcript nodes. I don't need to go into great detail here, because Bob Christenson at Mustardseed Media has a great video that demonstrates how to use Nodereference URL and Views Attach to link the two nodes together. In my use case, I end up with a link on my Video node to add a new Transcript node. Clicking on that link takes me directly to the node/add/transcript page. The node title for the Transcript node is automatically generated, and when it is saved, there is a link on the Transcript node to the Video node and vice versa.
Next is creating the title of the Transcript node. What I wanted was to have the title of the Transcript node by the title of the Video node with ' - Transcript' attached (i.e. My Video Node Title - Transcript). As explained in the video, the two content types are linked together by a nodereference field (field_video_ref) in the Transcript node type that refers to the Video node. This creates a [field_video_ref-title-raw] token that I can use. I enable the Automatic Nodetitles module, which adds an "Automatic Title generation" text form group on my content type settings form. Using my handy dandy token, I set the value in the Pattern for the Title" field to be
[field_video_ref-title-raw] - Transcript
and select the "Automatically generate the title and hide the title field" option. When I go to create the Transcript node, the Title field is hidden, but the node title is correctly created when it is saved.
The last requirement to take care of is the URL alias for the Transcript node. As I said above, I want the alias to be the same as the alias for the Video node with '/transcript' appended to the end. Once again, Token module comes to the rescue. Since I am using the field_video_ref field, there are a number of tokens generated for that field:
[field_video_ref-nid] Referenced node ID
[field_video_ref-title] Referenced node title
[field_video_ref-title-raw] Referenced node unfiltered title. WARNING - raw user input.
[field_video_ref-link] Formatted html link to the referenced node.
[field_video_ref-path] Relative path alias to the referenced node.
[field_video_ref-url]
In my case, I want the [field_video_ref-path] token, since that gives me video/national/my-video-node-title, making my full Transcript alias [field_video_ref-path]/transcript.

Now that this is all in place, here's the functionality that I have:
- The Video node URL alias is generated using a specific taxonomy vocabulary
- A link to create a Transcript node from the Video node
- A link to the finished Transcript node on the Video node and vice versa
- The Transcript node title and URL alias generated based on the title and URL of the Video node.
And all of this without writing one line of custom code in a module. All of this demonstrates the power of Token module and how it gives you so many options to automatically generate URLs, titles, and many other pieces of information for you automatically based on specific criteria.
On a side note, the (valid) question could be asked "why not just put a text area in the Video node for the transcript?", and that would be valid. However, don't let that distract from the point of this post, which is to demonstrate the power and flexibility that putting a few modules together gives you out of the box (so to speak) with Drupal.
Recently, a client approached us to create functionality for their Drupal site similar to what Zappos.com does, but based on user activity of the site. The idea is that we would present the user a map, and plot the latest user activity update as a point on the map using geocoded data based on IP address. Then, after a certain interval of time, we make an ajax call to the server to see if there has been any new activity updates in this interval. Kind of like a Facebook wall meets maps. Sounds easy enough, right?
Contrib Modules Used
Activity Module - I used this to set up what user activities would be recorded. It's actually pretty good and has a decent number of triggers you can set out of the box. For example, "when a user logs in, record [username] has logged in." The module uses tokens from the token module to do the string replacements. The client later asked me to add in the user's picture, and thus I had to write a new custom module to add in the token to the list of available tokens.
GeoUser - This module is what I used to gather the (approximate) latitude and longitude for a user. Like many other modules, it had an external dependency (GeoCityLite.dat) that needed to be put in the sites/all/libraries directory, but the lookup was actually pretty fast. I didn't do any load testing here or anything, but it actually only does the lookup when a user logs in. (Note: at the time of this post, this module hasn't been updated since April of 2008)
Custom Module Time
I am pretty familiar with the Google Maps API, so I decided to keep it as simple as possible. I created a module that printed out a page that displayed a Google Map with the latest user activity post and got the lat/long from the db and plotted it on a map. That's pretty easy if you just look at the API reference. The tricky part was figuring out the query to combine the tables from the activity and geouser tables. The result of that looked something like this:
$sql = "select message as data, lat as lat, lon as lon, activity.aid

	from activity_messages

	inner join activity_targets on activity_targets.amid=activity_messages.amid

	inner join activity on activity.aid=activity_targets.aid

	inner join node on activity.uid=node.uid

	inner join geouser on activity.uid=geouser.uid

	order by activity.aid desc

	limit 1";

	$result = db_query($sql);
All you need to do then is get the message, and the lat/lon pass it off to the Google Maps API, and you get a map. So now that I had a map, I looked at the Zappos site in firebug and figured out that they were just doing an ajax call to the server every 5 seconds or so. So I wrote a couple of functions in my module:
function custom_map_menu() {

	  $items['map_update'] = array(

	    'title' => t("Maps Update"),

	    'page callback' => 'custom_map_update',

	    'access arguments' => array('access content'),

	  );

	  return $items;

	}
function custom_map_update() {
if(is_numeric($_GET['time'])) {
$end_time = $_GET['time'];
$start_time = $end_time - variable_get("custom_map_seconds",5);
$sql = "select message as data, lat as lat, lon as lon, activity.aid
from activity_messages
inner join activity_targets on activity_targets.amid=activity_messages.amid
inner join activity on activity.aid=activity_targets.aid
inner join node on activity.uid=node.uid
inner join geouser on activity.uid=geouser.uid
where activity_targets.uid=0 and activity.created >=%d and activity.created <= %d
order by activity.aid desc
limit 1";
$result = db_query($sql,$start_time,$end_time);
$array = db_fetch_array($result);
$array['data'] = str_replace('"',"'",$array['data']);
if(!empty($array['lat']) && !empty($array['lat'])) {
print json_encode($array);
}
}
}
In the code above, the hook_menu just maps a url to a function call. In the function custom_map_update() I pass in the current unix timestamp and then subtract 5 seconds from it to get the start_time and end_time. I then pass those values to my DB query and if I have results, I encode the results in JSON.
In the function that I used to display the initial map, I included a jquery.timer.js so that I could just call a javascript function and pass it a value and it would repeat. In this function (again that displays the intiial map, I integrated the code for the timer.js and the Google Maps API:
<script type='text/javascript'>
<?php $now = time();?>
<?php $milliseconds = variable_get("custom_map_seconds",5) * 1000;?>
$.timer(<?php print $milliseconds;?>, function (timer) {
var time = <?php print $now; ?>;
time = time + (i*<?php print variable_get("custom_map_seconds",5);?>);
marker.setMap();
infowindow.close();
var data = $.getJSON('/map_update?time='+time+'',function(data) {
var latlng = new google.maps.LatLng(data.lat,data.lon);
marker = new google.maps.Marker({
position: latlng,
map: map,
flat: true
});
infowindow = new google.maps.InfoWindow({content: data.data, maxWidth: 300});
map.setCenter(latlng);
infowindow.open(map,marker);
return
});
i = i+1;
marker.setMap();
infowindow.close();
});
</script>
That's the meat of it. What's going on here is every 5 seconds (based on the timer function call), I'm doing an ajax call to my custom_map_update() function and passing it the current unix timestamp so that it can determine exactly which interval to query the database on. It then gets the contents of the JSON object (if it finds any), prints the marker and the information window, and recenters the map.
Final Thoughts
This solution worked out pretty well. But the end result only works well if a LOT of people are performing activities and you have templates set up to record them. Something that would probably be an easier load on the server than doing that nasty query every N seconds would be to do the query once, and return the latest 100 results in ascending order. Then you could just loop through the JSON object to print out the messages and the points on the map. Why would I consider doing it this way? Mostly for performance reasons. If we were willing to sacrifice a certain degree of fresh content, I think it would end up being a better user experience because after every N seconds, you actually get a new result and the map re-centers itself. On the bottom of the front page of Drupal.org they did something similar to what I am describing here (without the recentering of course because you are looking at a map of the entire world).
The other day while hanging out in IRC, I was pinged by katbailey, the Lady of the Lovely Voice (I could listen to her talk for hours) with a question about sorting in Solr when a sort field doesn't contain a value. In particular, how can you control whether nodes without a value in the sort field show up at the beginning or end of the search results? In her particular case, there was a Price field that was being sorted on, but not all nodes had a Price value, and the ones without Price were showing up at the beginning of the list.
I hadn't dealt with that before, but Peter Wolanin (aka pwolanin), one of the Solr Gurus, piped up with the answer. It lies in schema.xml, one of the Solr configuration files. In this case, Katherine was using a field with the "fs_" prefix (see my previous post for more info on dynamic fields and how they work). In the config file, it is configured like this:
<dynamicField name="fs_*" type="sfloat" indexed="true" stored="true" multiValued="false"/>
This is a field of type sfloat, so we need to look at the configuration for that field type.
<fieldType name="sfloat" class="solr.SortableFloatField" sortMissingLast="true" omitNorms="true"/>
The secret sauce is the sortMissingLast attribute. It is explained in more detail in comments just above it in the config file.
<!-- The optional sortMissingLast and sortMissingFirst attributes are

	        currently supported on types that are sorted internally as strings.

	        - If sortMissingLast="true", then a sort on this field will cause documents

	        without the field to come after documents with the field,

	        regardless of the requested sort order (asc or desc).

	        - If sortMissingFirst="true", then a sort on this field will cause documents

	        without the field to come before documents with the field,

	        regardless of the requested sort order.

	        - If sortMissingLast="false" and sortMissingFirst="false" (the default),

	        then default lucene sorting will be used which places docs without the

	        field first in an ascending sort and last in a descending sort.

	       -->
So in this particular case, it is set so if Katherine was sorting by the Price field, any nodes that didn't have a Price value would be placed after all of the nodes that did have a Price value. If she wanted to place those items before the nodes with a Price value, she would have replaced
setMissingLast = "true"
with
setMissingFirst = "true";
And, if she wanted it to vary depending on whether the sort was ascending or descending, she would have added them both and set them both to false.
Now, as a side note, the sharp-eyed among you might have noticed that in Katherine's case, the settings were set properly for what she wanted; setMissingLast was set to true for that field, so the items without a Price value should have been displayed at the end of the list, not the beginning. As it turned out, the problem in her case was that the nodes that she thought did not have a value actually had a value of 0, which put them at the top of the list. So, wielding her Solr fu, she added a line to her hook_apachesolr_update_index() function to only index that field if it has a non-zero value.
function mymodule_apachesolr_update_index(&$document, $node) {
// The sale_price field will not have been set if the value was 0
if (isset($fields['sale_price'])) {
$document->fs_cck_field_sale_price = $fields['sale_price'];
}
}
This causes the Price field to keep from being indexed for nodes with value of 0 in it, so they are then placed at the end of the search results when they are sorted by Price.
So thus ends today's lesson in Solr. It should be noted that even though the issue turned out to be something different, all was not lost, because we got to learn about sorting on fields that don't have a value in the sorted field. A win-win all the way around, don't you think?
As some of you who follow Drupal Planet might have noticed, I have "taken over" the Acquia Drupal podcast. I've always followed Drupal podcasts, including the Acquia podcast. I had noticed that there had not been any new episodes put out in a while, and so I approached Robert Douglass and Bryan House of Acquia at Drupalcon San Francisco back in April about continuing the podcast . They agreed, and so I took it from there. The first episode - an interview with Steven Merrill from Treehouse Agency on continuous integration with Hudson and Simpletest - was released yesterday, and more are in the works. In fact, I interviewed Robert Douglass from Acquia today for the next episode, and we discussed all things Solr in Drupal. We covered a lot of information, so it should be a very useful episode for anyone interested in Solr.
So keep your eyes (and ears) open for future podcasts, and contact me via our contact form if you or someone else you know are doing something cool in Drupal that you think would be a good podcast topic.