
Building real-time features into Drupal is now easier than ever with the integration of the Node.js module. The Node.js module provides an API for socket based polling and pushing of updates to open connected clients. Writing custom modules to create dashboards for real-time monitoring is one way to demonstrate this capability. With the ability to monitor real-time clients can respond quicker to the needs of their clients. This article will demonstrate how to write a custom dashboard to display live searches and live views of content.
Install NodeJS
Before developing our custom module we need to set up our environment to run Node.js. Installation and dependencies are well defined by the NodeJS Integration Documentation. My environment includes a vagrant instance running CentOS 6.4. Using the instructions for installing via a package manager I set up the epel repository and ran the following command…
sudo yum install nodejs npm --enablerepo=epel
Additional NodeJS Dependencies
Once the installation is complete install additional dependencies by first installing the node package manager. For event broadcasting the WebSocket/polling library, Socket.io, is required. For HTTP streaming install the Request node module. Install Express * for the Node.js application framework and last, but not least, install the middleware Connect * to make these packages work together. Before installing the package manager and additional dependencies first navigate to the Drupal NodeJS module directory for npm to read package.json.
* Note: For further reading on Express and Connect middleware review the Understanding Express articles and A short guide to Connect Middleware.
Because I am using a vagrant setup I cd to the Drupal Node.js directory before running the install commands.
cd /vagrant/htdocs/sites/all/module/contrig/nodejs sudo npm install sudo npm install socket.io sudo npm install request sudo npm install express sudo npm install connect
My first package manager install attempt produced errors because it did not have permissions to write files. To resolve this I halted my vagrant instance and updated the Vagrantfile to provide the proper sync permissions. Once my file permissions were resolved I was able to install the node package manager modules without an issue.
Config File
Our Drupal Node.js module also requires a config file that can be copied from the 'nodejs.config.js.example' to ‘nodejs.config.js’. Depending on your setup you can change the hosts to localhost, or if you are running vagrant with a private ip address you can assign the private ip address used by your vagrant instance. You can also update the debug entry to be ‘true’ in order to monitor the events in the nodejs terminal.
Dashboard Module
In our custom module use hook_menu() to create a dashboard page.
function dashboard_realtime_nodejs_menu() { $items['realtime-dashboard'] = array( 'page callback' => 'example_nodejs_page', 'title' => Real-time Dashboard with NodeJS', 'access callback' => TRUE, ); return $items; }
Now define the dashboard page being called from hook_menu and add a JavaScrypt file to our dashboard to prepend our messages from Node.js.
function dashboard_realtime_nodejs_page() { drupal_add_js(drupal_get_path('module', 'dashboard_realtime_nodejs') . '/dashboard_realtime_nodejs.js'); $output = '
'; $output .= '
'; return $output; }
Next create the JavaScrypt file containing our JQuery. This query will grab the message from Node.js and append it to the classes defined on our dashboard page.
(function($) { Drupal.Nodejs.callbacks.dashboard_realtime_message = { callback: function (message) { // If this is the search message prepend it. if (message.data.subject == 'search') { var new_messages = $('.dashboard-search-wrapper').prepend(message.data.body); Drupal.attachBehaviors(new_messages); } // If this is the node-views message prepend it. if (message.data.subject == 'node-views') { var result_messages = $('.dashboard-nodeview-wrapper').prepend(message.data.body); Drupal.attachBehaviors(result_messages); } } }; })(jQuery);
With JavaScrypt defined and our dashboard viewable in Drupal we need to hook into the events we will create our messages from. In this example we will hook into two events, the node view event and the search event.
Node Views
In order to hook into our node view event we will implement Drupal’s hook_node_view(). This hook allows us to act on a node before it is rendered and provides us with the full node object. All we need for this example is the node title, but there is opportunities to display much more than the title. In order to pass the title to Node.js we use the Node.js module function of “nodejs_broadcast_message(‘node-views’, $node->title)” where the first variable passed is the type of message and the second variable is the message.
/** * Implements hook_node_view(). */ function dashboard_realtime_nodejs_node_view($node, $view_mode, $langcode) { nodejs_broadcast_message('node-views', $node->title); }
Our next step is to provide the dashboard with the message containing the text for searches on the site. To hook into site searches we will use the hook_search_preprocess() function. Drupal provides this hook for processing the search text before submitting for results. Within our hook we again call the nodejs_broadcast_message, but this time we pass the first variable as “search” and the second variable as the search text.
Search Terms
/** * Implements hook_search_preprocess(). */ function dashboard_realtime_nodejs_search_preprocess($text) { nodejs_broadcast_message('search', $text); }
If you are using the Apache Solr module to index and return results with Solr you can replace hook_search_preprocesss() with hook_apachesolr_query_alter(), or one of several hooks that passes the query parameters. Instead of altering the query you can capture the query parameter and pass it as the message.
/** * Implements hook_apachesolr_query_alter(). */ function apachesolr_realtime_nodejs_apachesolr_query_alter($query) { $params = $query->getParams(); nodejs_broadcast_message('search', $params["q"]); }
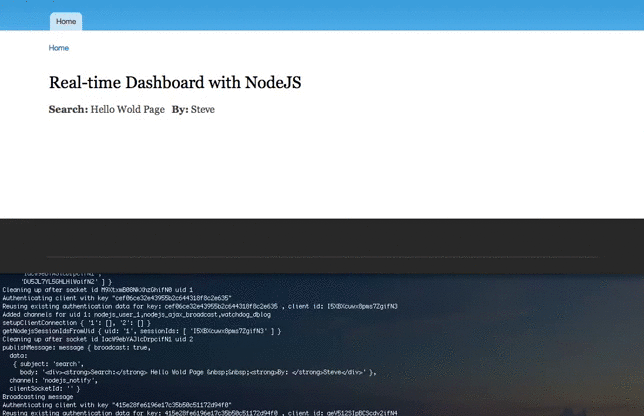
With the basics of our module defined you can now enable the module and start the node server (>node server.js) defined in the node.js contributed module. If you enabled debug in your config file you can monitor the terminal for activity.
Conclusion
Integrating Node.js with Drupal has never been easier thanks to the Node.js Integration module. Building real-time dashboards and other event driven displays provides clients the ability to respond more quickly to the activity on their site. For further benefit consider the value of saving these events for further data analysis and the challenges involved with storing and analyzing the quantity of data.